JavaScript: the fast and the furious
Techniques on how to optimize the performance of JavaScript intensive client-side apps.

Last summer I started getting increasingly interested in front-end performance. But I didn't want to just read about making fast apps, I wanted to deep-dive and optimize something real! On the other hand, I was finding it more and more annoying to manage the code-review process of my trainings. So, I decided to chase both metaphorical rabbits and learn about performance by building the app that would also make my trainings better...
Over time this "chase" turned into something real: DevDrive. And since now I'm pretty happy with the overall performance, I decided to look back and write about what techniques helped me the most.
DevDrive is written in React but all the ideas here can be applied to pretty much any usecase.
Code splitting
As you continue adding features to your app, your code-base will get bigger and bigger. At first nothing will be very obvious, but as your app gets increasingly complex you'll surely notice that it takes longer to start. And it kinda makes sense, because more JavaScript means longer times for download, parse, compile and execution.
However, we surely don't need all that code from the get-go. To be more specific, if I'm building an SPA, I don't need the code for the /settings page if I'm not even logged in yet. Or let's say you build a one-page app with tons of functionalities, like an airline booking system. I don't use the code that searches for my flight until I have actually wrote my journey details and pressed Find. But all this code which I don't need still gets sent down the network and is parsed by the JavaScript engine. You might argue that it's not executed and you'd be correct, but even so we're still wasting time which only gets more and more obvious on low-end devices.
The solution is to split our bundle in multiple, smaller files - usually called chunks - which we'll load just when we need them, thus having the overall app start much faster.
But, which parts do we split and which do we keep together?
1) Route-based code splitting
This is what pretty much every article and blog post out there recommends and I'll mention it here just in case you never stumbled upon it. This technique applies to SPAs and suggests that we create one chunk per route. So we'll have one for the /landing page, one for /home, one for/settings and so on. This way, when you navigate to the app we only send you the code for that particular page.
I implemented this technique in DevDrive with the help of webpackand theReact-loadable package. In the Pages.lazy.jsx file I defines components that, when mounted, request the real component from the network and then make the switch.
 import Loadable from 'react-loadable';

// Landing page
const LazyLandingPage = Loadable({
  loader: () => import('./landing/Landing.page'),
  modules: ['./landing/Landing.page'],
  webpack: () => [require.resolveWeak('./landing/Landing.page')]
});
const LazyLanding = props => <LazyLandingPage {...props} />;

// Home page
const LazyHomePage = Loadable({
  loader: () => import('./home/Home.page'),
  modules: ['./home/Home.page'],
  webpack: () => [require.resolveWeak('./home/Home.page')]
});
const LazyHome = props => <LazyHomePage {...props} />;

export {
  LazyLanding,
  LazyHome
}Then, in my Routes definitions, I use those components instead of the real ones:
 import {
  LazyLanding,
  LazyHome
} from './pages/Pages.lazy';

class Root extends React.Component {
  render() {
    return (
      <Switch>
        <Route exact path="/" component={LazyLanding} />
        <Route exact path="/home" component={LazyHome} />
      </Switch>
    )
  }
}Angular and Vue support it out of the box and even if you're building your own SPA, it should be pretty simple to implement it yourself by leveraging dynamic imports.
2) Functionality-based code splitting
Now that we've added route-based splitting, it's time to move even further by looking at the individual functionalities within a page. In terms of DevDrive, there are some scenarios which demand a simple modal. I haven't implemented it myself, rather I'm using the SweetAlert2library which weighs 70KB.
The catch: I'm not showing the modal right away!
So I split this library from the main bundle - using dynamic imports. The dynamic import returns a Promise where I can use the module via thedefault property
 function onClick() {
  import('../Swal.service').then(SwalService => {
    SwalService.default(
      /* ... */
    );
  });
}A good place to see it in action is the /join-team page where, if you're authenticated, those70KB are never sent!
3) Component-based code splitting
But that's not all! Thanks to my shitty phone and a poor connection I discovered that it takes quite a while to load the Monaco Editor plugin - this is what I'm using to write & edit code in the browser. It weighs 2.6MBwhich is really huge! I haven't been able to reduce it's size - I'm thinking it's a bug on their side - plus, I'm showing the editor straight away, unlike the SweetAlert library, so the solution above doesn't really apply.
Still, if we slightly adjust the first solution it will kinda help here too. So, I ended up splitting the component into a separate file and showing a placeholder text while it loads. Although technically it takes the same amount of time until you can use it, now the rest of the page loads faster so you can start reading the exercise right away. Plus, chances are that the editor is fully loaded until you scroll there.
 const Editor = React.lazy(() => import('./MonacoEditor.component'));

class MonacoEditorLazy extends React.Component {
  render() {
    return (
      <React.Suspense fallback={<p>Loading editor...</p>}>
        <Editor {...this.props} />
      </React.Suspense>
    );
  }
}Service Worker precaching
You win some, you lose some.
I'd say this is especially true when optimizing apps. The usual downside is that the code gets more complicated and less friendly for new developers joining the team. However, in terms of code-splitting there's a disadvantage to the experience itself: Waiting for the other chunk to reach the app.
In terms of route-based code splitting this might be neglectable but when it comes to the second scenario, most users expect instant responses.
As you can see above, the user has to wait quite some time for the modal to show which is definitely not what he/she expects. If we have multiple functionalities like this, all of the sudden the app starts fast but we have to wait every time we want to do something... Clearly not good!
I addressed this problem by downloading and caching all the chunks behind the scenes via a Service Worker. This way I make sure you get them instantly when you request them. There's still gonna be the cost of parsing and executing the code but my assumption is that most chunks will be fairly small so this is one cost I'm happy spending.
I used the resource-manifest-webpack-pluginwhich creates a JSON file with the names of the outputted assets. Then, from the Service Worker, I read the JSON and cache all the files specified there.
 self.addEventListener('install', function onInstall(event) {
  event.waitUntil(caches.open('devdrive-cache')
    .then(cache => fetch('/resources-manifest.json')
      .then(resp => resp.json())
      .then(jsonResp => cache.addAll(jsonResp.TO_CACHE))
      .then(resolve)
    )
  );
});Best tool for the job
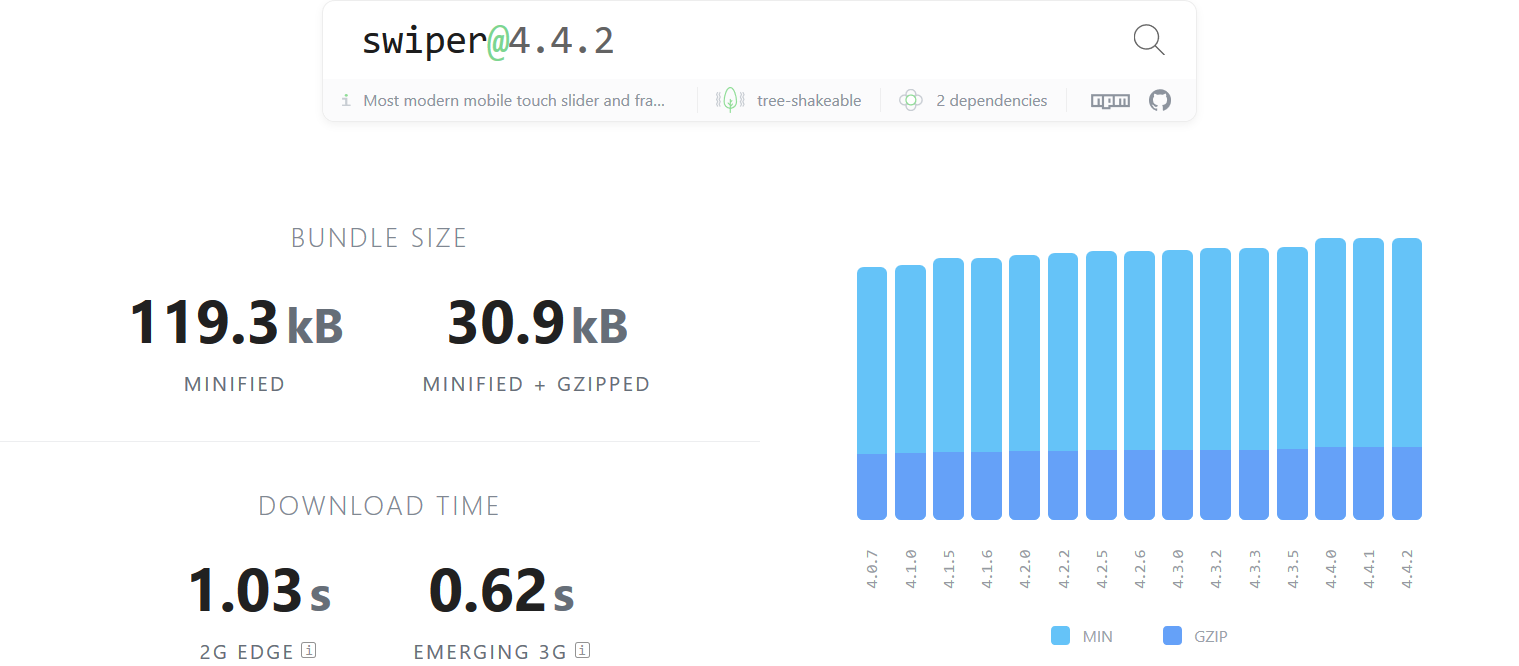
Another problem I encountered, although not in DevDrive but in another project, was the size of 3rd party dependencies. I needed a basic horizontal slider with touch support and stumbled upon Swiper. Happy with their good documentation and easy-to-use API, I quickly integrated it into the project. Later that day I rememberer I haven't checked the size of the library, so I quickly navigated to Bundlephobia, and to my shock discovered it weighs 119 KB.

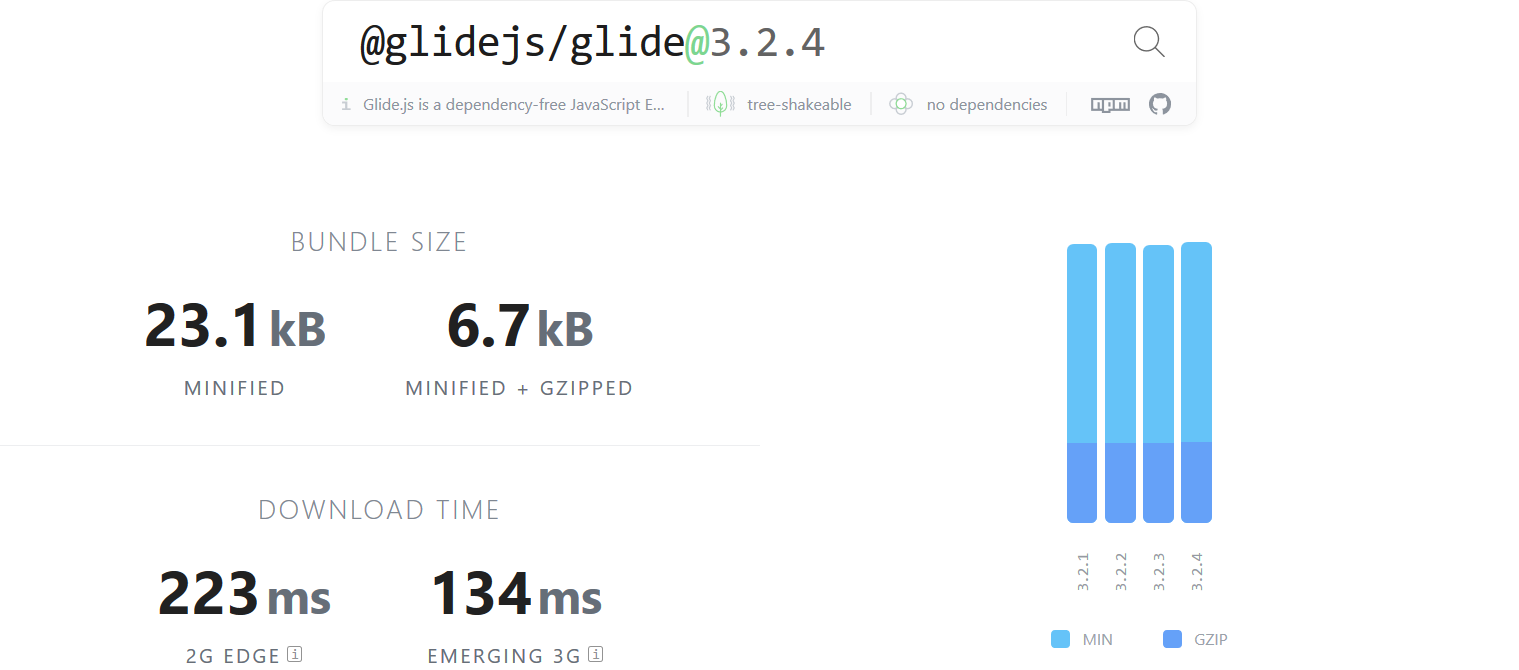
So although it was already up and running, I had to switch it with a smaller alternative, in this case glideJS which is only 23 KB .

So, remember to double-check the size of all your dependencies!
Server Side Rendering
I clearly remember how big of a deal SSR was early on. I was very excited to finally give it a try in the context of React and DevDrive. However, although it started and it still is just a side-project, it had to be in a working version until when the school year would have started and with it the front-end labs I teach. So unfortunately I had to also focus on some features and didn't manage to fully implement SSR the way I was envisioning it...
However, I managed to add just a tiny bit of it, which shaved around 200 millisecondson the start time. Let me tell you how:
Since some pages require the user to be authenticated, at first I basically delayed the rendering of all pages until I knew the status of the current user. For this I wrote a simple /ping API where I would POST the JWT and get back the user info.
Which to be honest, doesn't make any freakin sense!
I mean, I just got the static files from the server and then I have to ask the same server if I'm authenticated?! He should be telling me this from the very start!
So that's what I did! First I moved the JWT token from localstorage to cookiesso it's sent automatically by the browser. Then, on the server side, when I receive a request for the index.htmlI also read the cookie and send the user info right there in HTML.
 <body>
  <script>
    window.__PRELOADED_STATE__ = {
      "user": {
        "username": "iampava",
        "email": "pava@iampava.com",
        "avatarUrl": "/assets/images/avatars/i_avatar.png",
        "hasFullSubscription": true,
        "notifications": {
          "unread": "20",
          "list": null
        }
      }
    }
  </script>
  <script
    type="text/javascript"
    src="/dist/devdrive.7e79696e5c8a4011ba42.js">
    </script>
</body>See what I did there? 😅 This allows the front-end to just read from the global__PRELOADED_STATE__variable and decide what to do without another server request!!! In terms of actual implementations, I usedlodash templatesto simply parse and insert some custom code in the HTML before sending it.
Skeleton Screens
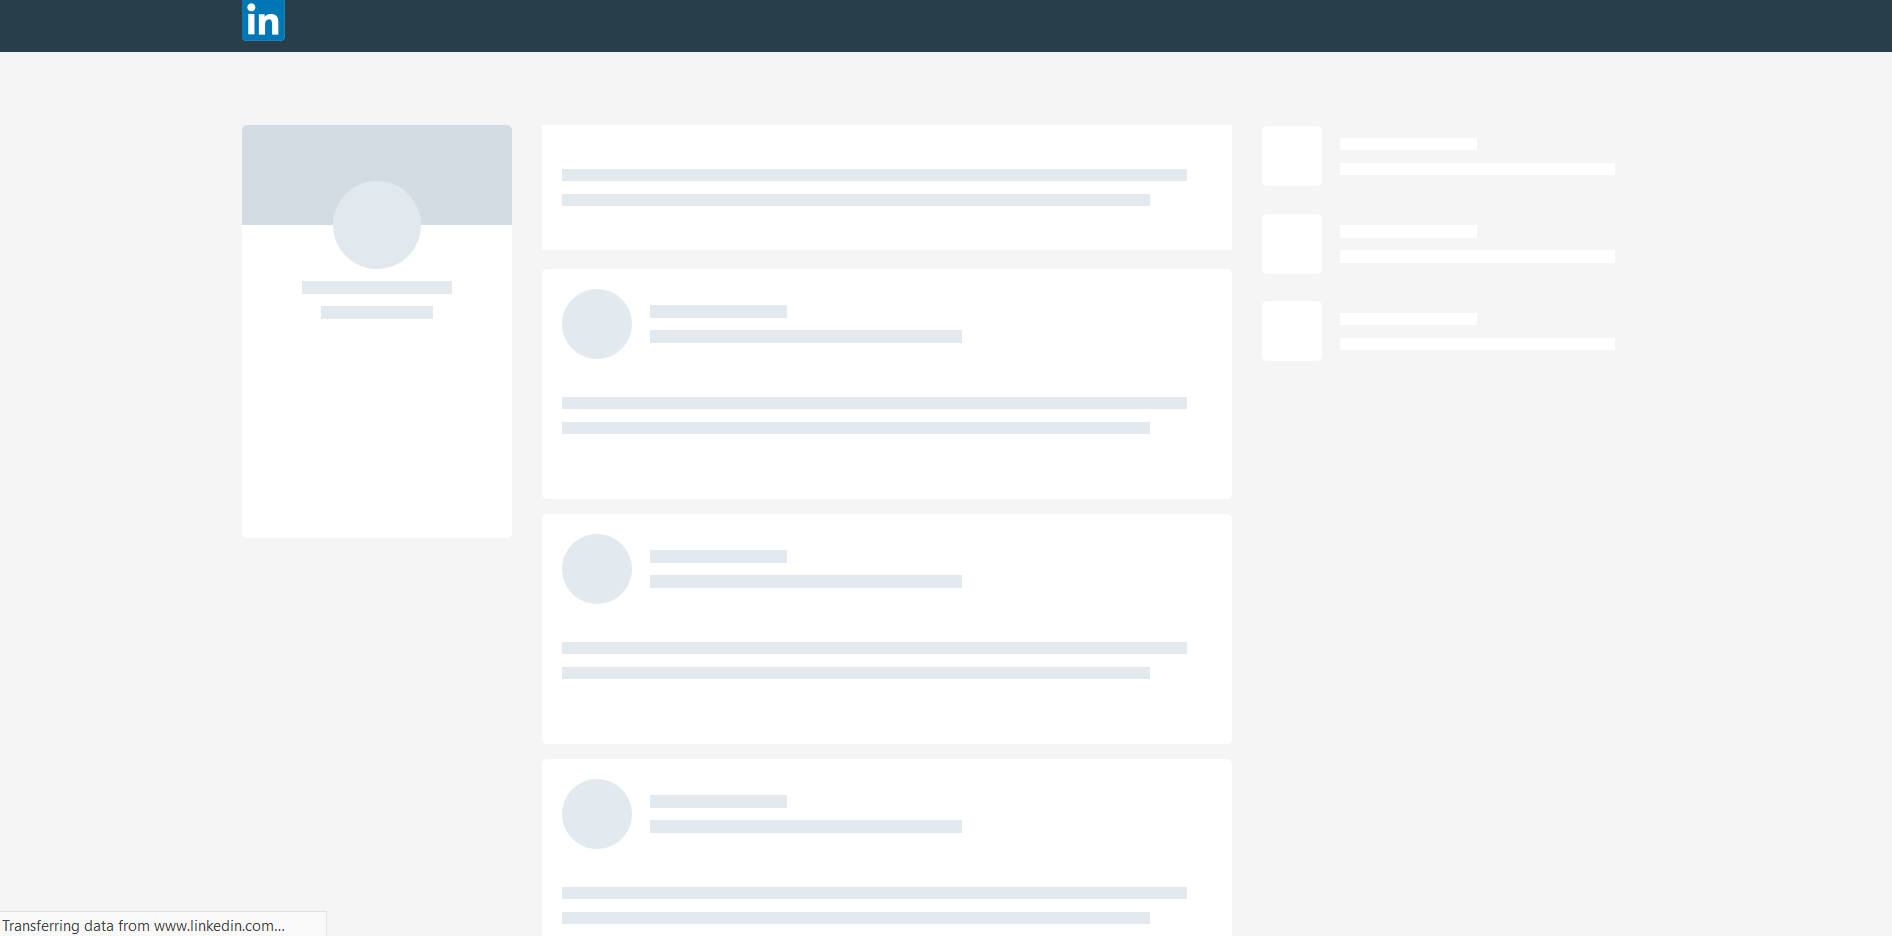
And finally a technique which is more about giving the appearance of speed. Skeleton screens are about pre-rendering the UI before the actual data has come from the server. Many websites already do it, LinkedIn being the first example that comes to mind.

Although I don't have any statistics or sciency reports that this is better, it kinda makes sense for me because instead of a blank screen I see things happening on the page.
There's not any special sauce here, you'll just have to implement the component again, but in the simpler "skeleton" version.
Now what? Well, let me give you a challenge! Take an idea, any idea for a side project you've got and build it while putting performance first. I learned so much by doing this that I must encourage you to do the same! It will be a hell of a ride 🔥
Discuss on Twitter- 1 Lighthouse CLI
Now that you have a fast app, how do you keep it fast? Well, how about integrating Lighthouse in your build process and passing or failing the production build based on custom defined metrics.
That's what I currently do at DevDrive, and I'll write about it next month.
- 2 Slides on the same topic

I am Pava, a front end developer, speaker and trainer located in Iasi, Romania. If you enjoyed this, maybe we can work together?
